Tuesday, January 19, 2016

Connecting DataGrip to Redshift

Recently I started evaluating JetBrains' new DataGrip product, and I decided to create an updated version of my instructions for connecting to Amazon Redshift, using this new tool with the latest JDBC driver from Amazon.

Prepare Amazon Redshift JDBC Driver

  1. Browse to your AWS Redshift console, go to the "Connect Client" section and download the Redshift JDBC driver from Amazon.
  2. Copy the file from your Downloads folder to somewhere more permanent, like your home directory or a location accessible to all users on the computer.
  3. Set permissions to allow everyone to read the driver jar file:
    chmod a+r RedshiftJDBC41-1.1.9.1009.jar
  4. On OS X, you may need to remove the quarantine mode attribute:You can see this attribute with the "ls -l@" command:
    ls -l@ *.jar-rw-r--r--@ 1 ryan staff 2198193 Aug 28 13:42 RedshiftJDBC41-1.1.9.1009.jar com.apple.metadata:kMDItemWhereFroms 194 com.apple.quarantine 64
    
    The quarantine attribute can be removed with this command:xattr -dr com.apple.quarantine RedshiftJDBC*.jar

Add Redshift Driver to DataGrip

  1. In Datagrip, go to Manage Data Source (Cmd + ; on OS X)
  2. Press the + button in the upper left and select "Driver" to create a new Database Driver
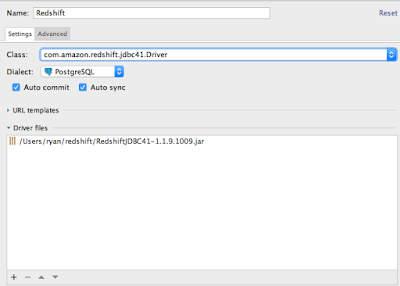
  3. In the "Driver Files" section, press the + button in the lower left and select the path where you put the driver JAR file.
  4. Use the following settings: 
    • Class Name: com.amazon.redshift.jdbc41.Driver
    • Dialect: PostgreSQL
    • Auto Commit: 
      • Yes for convenience, 
      • No for safety (This Requires you to explicitly commit after executing DML)
    • Auto Sync: Yes (turn this off if it slows you down too much)
    • Click Apply

    Connect to your Redshift Instance with the new Driver


    1. Press the + button again and select the name of the driver you just created (Redshift)
    2. Go to your Redshift Console in AWS.  Under "Connect Client", select your cluster and get the JDBC URL.
    3. Copy the JDBC URL into the URL field in DataGrip
    4. Enter your username and password, and test the connection.  
    5. Hit OK.  You can now query Redshift from DataGrip!

    Monday, August 31, 2015

    Connecting IntelliJ to Redshift

    Are you using Amazon's Redshift Service and you want to connect to it via IntelliJ?  Here's how you do it.

    Download Redshift JDBC Driver from Amazon

    1. In your Redshift console, go to the "Connect Client" section and download the Redshift JDBC driver from Amazon.
    2. Copy the file from your Downloads folder to somewhere more permanent, like your home directory or a location accessible to all users on the computer.
    3. Set permissions to allow everyone to read the jar file:
      chmod a+r RedshiftJDBC41-1.1.7.1007.jar

    Add Redshift Driver to IntelliJ

    1. In IntelliJ, go to View / Tool Windows / Database
    2. Open the Data Source Properties
    3. Press the + button and select "Database Driver" to create a new Redshift Driver
    4. In the "Driver Files" section, press the + button and select the path where you put the driver JAR file.
    5. If the driver can be read successfully, the Class Name drop down should show more than just "java.sql.Driver".  
      • In my case, it couldn't be read because OS X had put the file in quarantine mode, which you can see with the "ls -l@" command:
        ls -l@ *.jar
        -rw-r--r--@ 1 root  wheel  2198193 Aug 28 13:42 RedshiftJDBC41-1.1.7.1007.jar
         com.apple.metadata:kMDItemWhereFroms     211
         com.apple.quarantine      67

      • The quarantine attribute can be removed with this command:
        xattr -dr com.apple.quarantine RedshiftJDBC41-1.1.7.1007.jar

    6. Use the following settings:
      • Class Name: com.amazon.redshift.jdbc41.Driver
      • URL Template: jdbc:redshift://{host}:{port}/{database}
      • Default Port: 5439 (or whatever your cluster uses)
      • Dialect: PostgreSQL
      • Requires Authentication: Yes
      • Local Database: No
      • Auto Commit: Yes for convenience, No for safety (This Requires you to explicitly commit after executing DML)
      • Auto Sync: Yes (turn this off if it slows you down too much)
    7. Click Apply

    Connect to your Redshift Instance with the new Driver


    1. In the Same Data Sources and Drivers Window in IntelliJ, press the + button again and select Redshift
    2. Go to your Redshift Console in AWS.  Copy the string under "Endpoint" into the "Host" field in IntelliJ.  this is in host:port format, so cut the port off, delete the ":" and paste the port into the port field.
    3. Enter your database name, user, and password, and test the connection.  
    4. Hit OK.  You can now query Redshift from your IDE!


    Thursday, June 10, 2010

    Bucket DateTimes in T-SQL

    Today at work I was working on a SQL Server Reporting Services report which shows us the number of rows being created in a certain table in each 10-minute interval. While working on this, I tried several different ways in which I could "bucket" the datetime column into the same ten-minute period. At the end, I finally decided to extract this logic into a User-Defined Function which can bucket any datetime into any size interval.

    Here's the function:


    /* BucketDateTime:
    * Buckets any datetime into an interval of the given size.
    * Returns the minimum datetime for the interval chosen, or NULL if @MinutesPerBucket < 1
    * Example: bucket times 7:29pm and 7:31pm to the nearest 30 minute interval
    * SELECT dbo.BucketDateTime('2010-04-01 19:29:00', 30) => '2010-04-01 19:00:00.000'
    * SELECT dbo.BucketDateTime('2010-04-01 19:31:00', 30) => '2010-04-01 19:30:00.000'
    */
    CREATE FUNCTION [dbo].[BucketDateTime]
    (
    @SourceDateTime DATETIME, -- The DateTime to bucket
    @MinutesPerBucket INT -- The number of minutes per bucket.
    )
    RETURNS DATETIME
    AS
    BEGIN

    IF (@MinutesPerBucket < 1) RETURN NULL

    -- The earliest possible datetime
    DECLARE @Epoch DATETIME

    -- # of minutes passed between the epoch and source datetime
    DECLARE @MinutesSinceEpoch INT

    -- The value to bucket @SourceDateTime into, based on @MinutesPerBucket
    DECLARE @BucketDateTime DATETIME

    -- # of minutes passed between @BucketDateTime
    DECLARE @BucketMinutesSinceEpoch INT

    -- This value is from Books online: http://msdn.microsoft.com/en-us/library/ms186724.aspx
    SET @Epoch = CAST('1753-01-01' AS DATETIME)

    SET @MinutesSinceEpoch = DATEDIFF(mi, @Epoch, @SourceDateTime)

    SET @BucketMinutesSinceEpoch = @MinutesSinceEpoch - (@MinutesSinceEpoch % @MinutesPerBucket)

    SET @BucketDateTime = DATEADD(mi, @BucketMinutesSinceEpoch, @Epoch)

    RETURN @BucketDateTime

    END

    GO


    Tuesday, June 8, 2010

    Execute LINQ queries without locking any tables

    At work I'm building an application which queries a SQL Server backend with LINQ to SQL, and I recently found that some of my queries were slow due to table locking. I found this excellent blog post referencing Scott Hanselman's blog post which describes how to execute LINQ queries without locking the source tables:

    Deciding to go with option 1, I came up with an elegant solution for easily adding this to any LINQ queries. Let's say you are using a LINQ query like this:

    var query = from f in Foo
    select new { Foo = f };

    foreach (var item in query)
    {
    //Do something
    }

    In this case, the query is actually executed in the foreach loop. By implementing an extension method, you can easily change this to use a transaction with the "Read Uncommitted" Isolation Level like so:

    var query = from f in Foo
    select new { Foo = f };

    foreach (var item in query.ToListNoLock())
    {
    //Do something
    }

    The extension method is implemented like so:


    public static class IEnumerableExtension
    {
    public static TransactionScope CreateNoLockTransaction()
    {
    var options = new TransactionOptions
    {
    IsolationLevel = IsolationLevel.ReadUncommitted
    };
    return new TransactionScope(TransactionScopeOption.Required, options);
    }


    public static List<T> ToListNoLock<T>(this IEnumerable<T> query)
    {
    using (TransactionScope ts = CreateNoLockTransaction())
    {
    return query.ToList();
    }
    }
    }


    And then of course you can implement new versions of various other extension methods on IEnumerable/IQueryable, such as SingleOrDefault, FirstOrDefault, etc.


    Note that this is the same as adding (NOLOCK) hints to EVERY table in your query. I do not currently know of a way to add nolock hints to individual tables.