Add Redshift Driver to DataGrip
- In Datagrip, go to Manage Data Source (Cmd + ; on OS X)
- Press the + button in the upper left and select "Driver" to create a new Database Driver

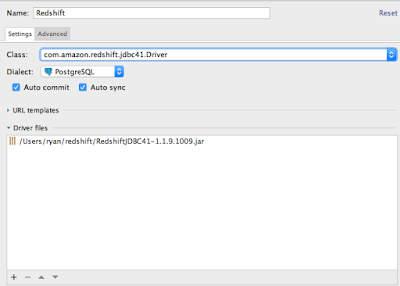
- In the "Driver Files" section, press the + button in the lower left and select the path where you put the driver JAR file.
- Use the following settings:
- Class Name: com.amazon.redshift.jdbc41.Driver
- Dialect: PostgreSQL
- Auto Commit:
- Yes for convenience,
- No for safety (This Requires you to explicitly commit after executing DML)
- Auto Sync: Yes (turn this off if it slows you down too much)

- Click Apply
Connect to your Redshift Instance with the new Driver
- Press the + button again and select the name of the driver you just created (Redshift)
- Go to your Redshift Console in AWS. Under "Connect Client", select your cluster and get the JDBC URL.
- Copy the JDBC URL into the URL field in DataGrip
- Enter your username and password, and test the connection.
- Hit OK. You can now query Redshift from DataGrip!

